Sunday, April 3, 2011

BBQ Pork Tenderloin and Greek Pork Loin Ribs

Wow. I can't believe how long it's been since I've posted. I've been cooking a lot, and taking pictures of some things, but just haven't got them on here! Anyways, I came across a huge deal on pork tenderloin and pork loin ribs at Sobey's a couple weeks ago and ended up buying a couple of each. Like seriously, it was $1.99/lb. Can't beat that price! I made the pork tenderloin a couple weeks ago and it was so good I made the exact same recipe this past weekend too for the in-laws. I use Mike's favorite BBQ sauce so of course HE loves it! And it was actually pretty quick to cook too. I served it with quinoa (loaded up on quinoa at costco!) and a salad with fresh pineapple.

BBQ Pork Tenderloin
*On most of the websites, it said to tie the pork tenderloin together for even cooking. But I didn't and it turned out fine.
2-3lbs pork tenderloin
salt and pepper
Your favorite BBQ sauce recipe or store bought sauce. I used President's Choice Smokin' Stampede Beer & Chipotle BBQ sauce

Season the tenderloin with the salt and pepper and sear all sides in a hot pan with a little bit of oil. Spray a roaster with pam and then put a generous amount of bbq sauce on the bottom, add a little bit of water to thin if desired. Place the seared pork directly on top of the sauce and then cover with a bunch more bbq sauce. Cook at 450 degrees for 45 minutes, basting every 15 minutes. If sauce is getting too thick, thin with a bit of water. Let rest for 10 minutes before slicing.

Greek Pork Loin Ribs
Boil 2 racks pork loin ribs (or whatever other ribs you have) in large pot on stove for 45 min- 1 hour or until meat is super tender and starts falling off the bone. Put in large roaster and season with generous amounts of oregano, lemon juice, and garlic powder (or greek seasoning if you have it). Broil in oven until you're too hungry to wait any longer, or about 25 minutes, flipping half way through. (be sure to season both sides). Mike said they were even better the next day!

Friday, February 18, 2011

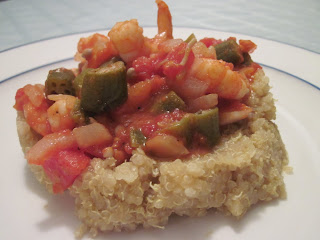
Toasted Quinoa with Okra, Tomato, & Shrimp

My friend Holly introduced me to quinoa last winter, however, I never made it until the other night. Fate, more than anything, brought me to this recipe. I saw quinoa on sale at coop the other week when I was there, and decided to pick some up not knowing when/if I'd actually get around to making it. I had bought some okra quite a few months ago, canned of course, as it reminded me of my trip to Louisiana in Jan/09 and figured I needed to diversify my veggie intake. And I usually have a large supply of canned tomatoes of varying preparations but my stock has run exceedingly dry lately, so I picked up a couple cans at Walmart last week.

So as the story goes, our roomate Trevor (friend of Mike's who's in taking a welding course) bought this HUGE bag of shrimp a few weeks ago at Costco. Now, I've cooked shrimp like four times in my life... not a huge shrimp fan and don't really know what to do with it other than a quick white wine shrimp pasta (ooh , I should post the recipe for this) or just plain old fried garlicky lemon shrimp.

So Mike and I are browsing through my pantry, trying to come up with some other pairing for shrimp other than pasta. He finds my box of quinoa! On to the world wide web I go to find a recipe for quinoa and shrimp. After maybe browsing four recipes, I come to the most perfect recipe in the world ---- (perfect = I have all the ingredients!!!). So Mike and I set out to make this, and we had a blast! My mom was enjoying entertaining Gray, while mommy and daddy were busy in the kitchen and we all had fun.


The only substitution I used was hot pepper sauce instead of dicing up hot peppers... oh and I don't have a fine enough strainer so I kinda just added some water to the quinoa to rinse it in a bowl. It took a bit more time to toast, but still turned out fine. I also used 1/3 cup more chicken stock as I didn't want 1/3 cup sitting in my fridge!

I really truly enjoyed this dish and it's much different than the casseroles that I usually make. I'd highly recommend trying it as it uses ingredients that aren't common staples in Saskatchewan! If you do try it, let me know what you think!

Amanda's Spaghetti Pie

I got this recipe from my friend Amanda in November of 2009 and somehow it got lost in my facebook inbox and I didn't stumble across it until over a year later! It was absolutely delicious and super easy, especially since I had cooked extra spaghetti the night before! I also used pasta sauce instead of making my own, which was super convenient. I really look forward to making this again!! A side ceasar salad really complimented it well, and as an afterthought, garlic toast would have been delish!

Amanda's Spaghetti Pie
Crust:
1 300g box of spaghetti
3L boiling water
2 eggs
1/3 c Parmesan cheese
1 Tbsp oil
2 tsp. salt
2Tbsp butter

Filling:
1 cup grated mozzarella cheese
1 cup cottage cheese
1 Tbsp oil
1lb beef
1/2 cup chopped onion
1/4 cup chopped green pepper
1 can diced tomatoes
5 1/2 oz can tomato paste
1 tsp white sugar
1 tsp oregano
1/2 tsp salt
1/4 tasp garlic powder

Crust:
Cook spaghetti in boiling water with oil and salt until tender but firm (~11-13min). Drain. Add eggs, cheese, butter and mix well. Shape into crust in greased pie plates

Filling:
spread cottage cheese over bottom of crust. Fry hamburger, onion and green pepper. Add tomatoes and tomato paste, sugar, oregano, salt and garlic powder (boil off excess water, if any). Mix together and pour over cottage cheese. Bake uncovered @ 350 F for 30 mins. Sprinkle with shredded mozzarella and bake for another 5 mins more. Freeze or serve and enjoy!!

Monday, February 7, 2011

Pumpkin Dessert Squares

This is a recipe from Mike's Aunt Pearl's cookbook. Lots of yummy recipes in here and this pumpkin dessert is one of our favorite! We get a kick out of some of Aunt Pearls recipes as they are enough to feed a football team! Her monster cookie recipe has 18 cups of rolled oats and 3lbs of peanut butter in it!!! But when you have a big family, you want a recipe that yields 5 ice cream pails full!! I love any cookie that has a pound of M&Ms in it! This recipe for pumpkin squares is so easy and it makes a 9x13 pan so no fear, you won't have to add 12 eggs or a pound of margarine or anything crazy like that! I buy canned pumpkin after Thanksgiving once it goes on sale! I made this for the superbowl party yesterday, along with my favorite Chili Dip (see previous posts).

Aunt Pearls Pumpkin Dessert
4 cups pumpkin
1 can canned milk (Alpha 2%)
4 eggs
2 tsp ginger (or less)
1 tsp cinnamon
2 cups white sugar (I usually use 1 1/2 cups)

Beat eggs well. Add the rest of the ingredients and beat all together well. Pour into a 9x13 pan (not glass). Sprinkle 1 box of dry butter pecan cake mix all over the pumpkin mixture. Then cut very thinly 3/4 cup of hard margarine. Lay all over the cake mix. (I melted this and spread it on). Optional: Sprinkle one cup of chopped pecans or walnuts. Bake at 350 for 45 minutes or until toothpick comes out clean. Serve with whipped cream or cool whip.

I had to add an extra 15 minutes in my oven till the toothpick came out clean! I also only had 3 eggs and crossed my fingers and it turned out fine. The filling was just a little less firm.


Monday, January 31, 2011

Perogie Casserole

Wow it has been way too long since my last post. Well, since October 21st, I have a new joy in my life! My son Grayson entered the world Nov.13/10 at 1123 am weighing 8 lbs 5 ounces and was 21 1/4 inches long. At his 2 month shots, he was 12 lbs 8 ounces and 23 inches long! The pic to the right is of him enjoying his bath - it doesn't matter how fussy or grumpy he is, as soon as we put him in his bath he is all smiles! So I've been adjusting to being a mom and doing far less cooking than I was used to, so between that and trying to decide if I should use my time to eat, shower, or nap, blogging got left behind!

Our freezer quit working on us a few weeks ago and before we had realized it, things had started melting in the freezer. This included my bag of perogies that my mom got for me from my late grandmothers friend in Porcupine Plain. These perogies are second to none I've ever tasted and I cherish them and rarely share them with anyone. So imagine my horror when I find that they are one of the victims in this unfortunate freezer melt! I didn't have time to do anything with them at the time (It was 11pm at night and I had a crying baby to tend) so I tossed them in the fridge freezer and figured I'd deal with them later. Well later came and they were frozen in one solid block. I tried to boil them up, but instantly began falling apart in the water. So I improvised and they turned out fantastic!

Perogie Casserole
Take one bag of perogies, flash boil them in some water till their soft but not cooked. Put them in a roaster or casserole dish. In a separate bowl, mix up a can of cream of chicken or mushroom soup with 1/2 cup water and 1/2 cup sour cream, salt and pepper, garlic powder, and cayenne pepper (just a pinch). Pour over and stir till distributed evenly throughout. Top with 1/2 cup crumbled bacon and 1 cup crisp fried onions (they come in a bag from superstore in the international aisle, or could get french's fried onions). Bake at 375 for 30 minutes.

SO yummy and so easy! I was so scared I'd have to throw the perogies out but luckily was able to salvage them! No picture as we ate it too fast :P

Thursday, October 21, 2010

Freezable Casseroles

A couple weeks ago I had a spurt of energy and decided to make up some meals to freeze for before/after baby comes. I used what I had on hand and made some new and old casseroles and recipes. I made two meat pies, Good Neighbor Casserole, Judy's Black Bean and Corn Casserole and two hashbrown casseroles (well one recipe, divided in half). I lined some of the pans with tinfoil so that once frozen, could be transferred to a large freezer bag and that way my pans wouldn't be tied up. I haven't exactly had any more bursts of energy, so they've stayed in the pans thus far, but if I ever have the urge to make something and need them - they're super easy to access. I've actually already busted into one of the casseroles as I haven't been able to do any cooking lately and it was absolutely delicious. The 'Good Neighbor Casserole' Recipe I found in my Company's Coming 'Gifts from the Kitchen' Recipe book was fantastic, almost like a make-shift lasagna. I baked everything as directed before freezing, and then to reheat I cooked from frozen for an hour at 375 degrees. The cheese on top was nice and chewy and Mike and I both really loved this dish.

Pictured above: Top Left and Middle Left: Good Neighbor Casserole
Top Right: Judy's Black Bean and Corn Casserole
Bottom Left and Bottom Right: Hashbrown Casserole
(You're probably thinking how can I tell the difference between them when they're all covered in cheese, right?) yummmmm.....

Good Neighbor Casserole
2.5 lbs lean ground beef
large onion, chopped
3 cups spaghetti sauce, your choice (I like to use the garden selects version - has more veggies)
salt & pepper
12 oz broad egg noodles (didn't have so used elbow mac), cooked until tender but firm
8 oz light cream cheese, softened
1 1/4 cups light sour cream
1 1/4 cups cottage cheese
1 1/2 cups grated cheese

Scramble fry the ground beef and onion until cooked, drain and rinse to get rid of excess fat. Add spaghetti sauce, salt and pepper. Cook for about another 10 min until heated through.

Divide cooked noodles between two greesed 2 quart (2 liter) casserole dishes. Divide meat mixture over each noodles.

Beat cream cheese and sour cream together with your mixer until smooth. Add in the cottage cheese and beat it as smooth as you can get it. Divide and spoon over each meat mixture.

Divide and sprinkle cheddar cheese over cream cheese mixture. Bake uncovered at 350 for about 40 min until hot. Makes 2 casseroles, 6 servings each.


Wednesday, October 6, 2010

Drumstick Dessert

My mom used to make this every summer to take camping with us! She'd make it ahead and freeze it, then we'd have a special treat for dessert. I haven't had this in years, but after my husband accused me of not liking peanut butter, I decided to make this! (I still have no idea what basis he made his claim on - especially when I eat PB on toast almost everyday). So when Camille was coming over for birthday supper and it was absolutely sweltering in my house and turning my oven on was the last thing I wanted to do (Yes, it's October), I decided this no-bake dessert was perfect.

Drumstick Dessert
Bottom Layer:
1 1/2 cups graham wafer crumbs
1/4 cup margarine
1/2 cup chopped peanuts (I used almonds)

Middle layer:
an 8oz pkg of cream cheese (I used 95% fat free cream cheese)
tub of cool whip (I used the light kind)
1/2 cup peanut butter
2 tsp vanilla extract
1/2 cup sugar (I used a bit less than 1/2 cup, and I used brown sugar).

Topping:
caramel and chocolate sauce

Melt the margarine and mix together the bottom layer, reserving a 1/2 cup for extra topping. I popped this in the freezer while I was mixing up the rest. Mix up all ingredients in the middle layer in your mixer, adding the cool whip last. Spread mixture onto crumb base and top with remaining crumbs, chocolate sauce and caramel topping. Usually this will freeze much quicker if you use the full fat varieties, but otherwise this will take a long time to set using the fat-reduced ones. For best results, freeze over night.